
Free Small Shrek Doll Crochet Pattern


- Data Posted: 19/10/2025
- Difficulty: Intermediate
- Height: 14 cm
- Designer: HappyHooks
- Category: Characters | TV & Cartoons
- Format: Downloadable PDF
Pattern Details
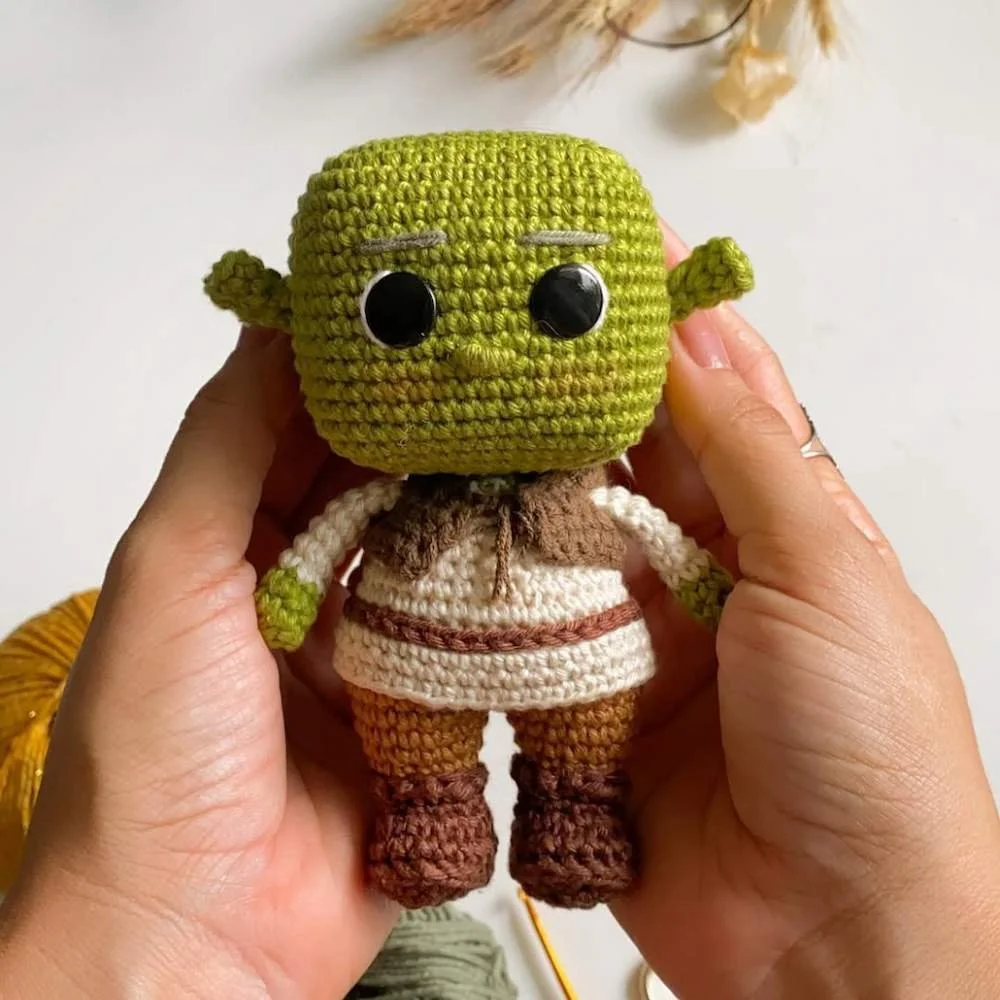
Bringing one of the most iconic characters from the big screen into the world of crochet has never been more fun. This Free Small Shrek Doll Crochet Pattern captures the charm of everyone’s favorite green ogre in an irresistibly cute, palm-sized version. Perfect for fans of handmade creations and pop culture alike, this pattern combines clean shaping, clever colorwork, and an instantly recognizable design. The finished amigurumi stands about 14 cm tall, making it an ideal collectible, gift, or desk companion that’s guaranteed to spark smiles.
This pattern comes as a free instant download PDF, written in US crochet terminology, so you can start right away and follow along easily. Inside, you’ll find step-by-step written instructions, clear stitch counts, and helpful photos to guide you through the process with confidence. The project is rated intermediate level, perfect for those who already know basic amigurumi techniques and want a rewarding, slightly challenging project that’s still manageable and fun.
The construction of this mini Shrek is thoughtfully designed to balance detail and simplicity. Each section, the head, body, arms, legs, ears, vest, and belt, is crocheted separately and assembled at the end. The pattern makes use of single crochet, half double crochet, and double crochet stitches, as well as basic increases and decreases to achieve the smooth shaping that defines his rounded belly and iconic ogre features. The face comes together beautifully with 12 mm flat safety eyes, a stitched nose, and small embroidered eyebrows, while the trademark green tone of his skin is worked in pistachio and military green yarns for that perfect cinematic match.
The body is constructed in continuous rounds, creating a clean, seamless finish. The legs and arms are worked separately and joined carefully to maintain stability, while the vest and belt add layers of detail that make the doll instantly recognizable. Even the ears are given special attention, they can be sewn, glued internally, or attached externally, depending on your preferred method, with all options explained clearly in the instructions. Once assembled, a touch of stuffing gives the doll its full, soft shape without making it heavy or rigid.
Because of its compact size and clear structure, this Shrek is ideal for crocheters who enjoy crafting characters that come together quickly yet look impressive when finished. You can customize him by experimenting with yarn textures, try using matte cotton for a classic amigurumi look or acrylic yarn for a softer finish. You can even add small details like a removable vest or micro accessories for fun display options.
This pattern is more than just a project; it’s a creative way to blend nostalgia, craftsmanship, and playfulness. It’s a reminder of how crochet lets you transform something as simple as yarn into a tiny piece of cinematic magic. Whether you make him as a gift for a Shrek fan, a collectible for yourself, or part of a movie-inspired amigurumi set, this little ogre will always stand out as a conversation piece. Working on this pattern takes around five hours from start to finish, offering the perfect balance between relaxation and creative focus. The instructions are detailed but approachable, and the result is a character that looks as charming as it feels. It’s also a fantastic stash-buster project, using small amounts of yarn in different shades of green, brown, and off-white to bring the design together.
Once completed, your mini Shrek toy will make a unique handmade gift for fans of animation. Display him proudly on your shelf, add him to your amigurumi collection, or pair him with other story-inspired creations for a themed set. Every stitch brings this familiar face to life in a new way, reminding us why handmade crafts have a magic all their own. So grab your hook, find your favorite shades of green, and enjoy crocheting this iconic little ogre. From the first round to the last, you’ll feel the joy of watching a beloved character take shape right in your hands, proof that with a bit of yarn and creativity, even the swamp can become something beautiful.
Materials:
100% mercerized cotton yarn (medium weight)
Dark Brown (7569)
Kraft Brown (7148)
Off-white (8176)
Pistachio (5800)
Military Green (5368)
White (8001)
Brown “Balloon Amigo” (0716) – for vest details
Polyester stuffing fiber
12 mm flat safety eyes
Crochet hook 2.5 mm
Tapestry needle
Long needle
Scissors
Pins
Silicone glue
Stitch opener (seam ripper)
Abbreviations:
MR: magic ring
Ch: chain
Rnd: round
Sc: single crochet
Sl st: slip stitch
Dc: double crochet
Hdc: half double crochet
Inc: increase
Dec: decrease
Tr inc: triple increase
BLO: back loop only
FLO: front loop only
Sh sc: stem single crochet
Top 10 Expert Tips for Crocheting Perfect Amigurumi 🧶✨
1. Choose your materials wisely 🎀: The right yarn and hook make all the difference. I always reach for non-fraying cotton or smooth acrylic, paired with a slightly smaller hook to keep the stitches snug. If you’re unsure where to start, check out our complete yarn and hook guide.
2. Consistent tension is everything 🤏: Good amigurumi starts with even stitches. If your fabric feels off—too loose, too stiff—don’t power through. Take a moment to swatch and adjust. Learn how to fine-tune in how to master crochet tension.
3. Mark every round—no exceptions 📌: Even after years of crocheting, I still use stitch markers religiously. It’s not about memory—it's about precision. For more tricks I swear by, read our stitch marker tutorial.
4. Stuff slowly and intentionally 🧸: Overstuffed toys lose shape, underfilled ones collapse. I add fiberfill gradually, shaping as I go. There’s an art to it, and you’ll get it with practice—or by reading how to stuff amigurumi without wrinkles.
5. Sew with care and patience ✂️: Don’t rush the assembly. Seam invisibly, match edges, and always secure your threads deep inside. A clean finish is what sets great work apart. Follow the steps in professional amigurumi sewing techniques.
6. Texture brings life to your stitches 🔄: A little puff stitch here, a popcorn detail there—they add so much personality. When used thoughtfully, texture makes even the simplest design shine. See examples in creative crochet textures.
7. Use safe, secure details—especially for little hands 👀: I’ve made hundreds of toys for children, and I never compromise on safety. Reinforced safety eyes or embroidered features are always my go-to. Read my checklist in amigurumi safety and finishing touches.
8. Let color tell the story 🌈: Whether it’s muted earth tones or bright pastels, color changes everything. Don’t be afraid to experiment—just make it your own. If you need ideas, browse unique amigurumi customization ideas.
9. Document your process 📓: After so many years, I can’t count how many times notes saved me from repeating a mistake—or helped me replicate a success. Stay organized with our project tracking template.
10. Trust the process, not perfection ⏳: Some projects take longer. Some need to be unraveled. That’s okay. The magic is in the making. When you hit a block, revisit tips to keep your crochet momentum.


View the Pattern here or download it in the button below 👇


Search by categories
Swipe sideways to see more categories


Contact Us
If you'd like your pattern to be shared and promoted, send us a message with the file attached—we’ll be happy to feature it, crediting you as the creator and including all your contact channels in the post so readers know it’s your work. If you’re also interested in collaborating, feel free to share your proposal here. We’d be delighted to work with you. Thank you so much for your understanding and collaboration!


