
Free Realistic Tropical Toucan Crochet Pattern


- Data Posted: 17/09/2025
- Difficulty: Intermediate
- Height: 12 cm
- Designer: Amigurumilandia
- Category: Animals | Birds
- Format: Web Version
Pattern Details
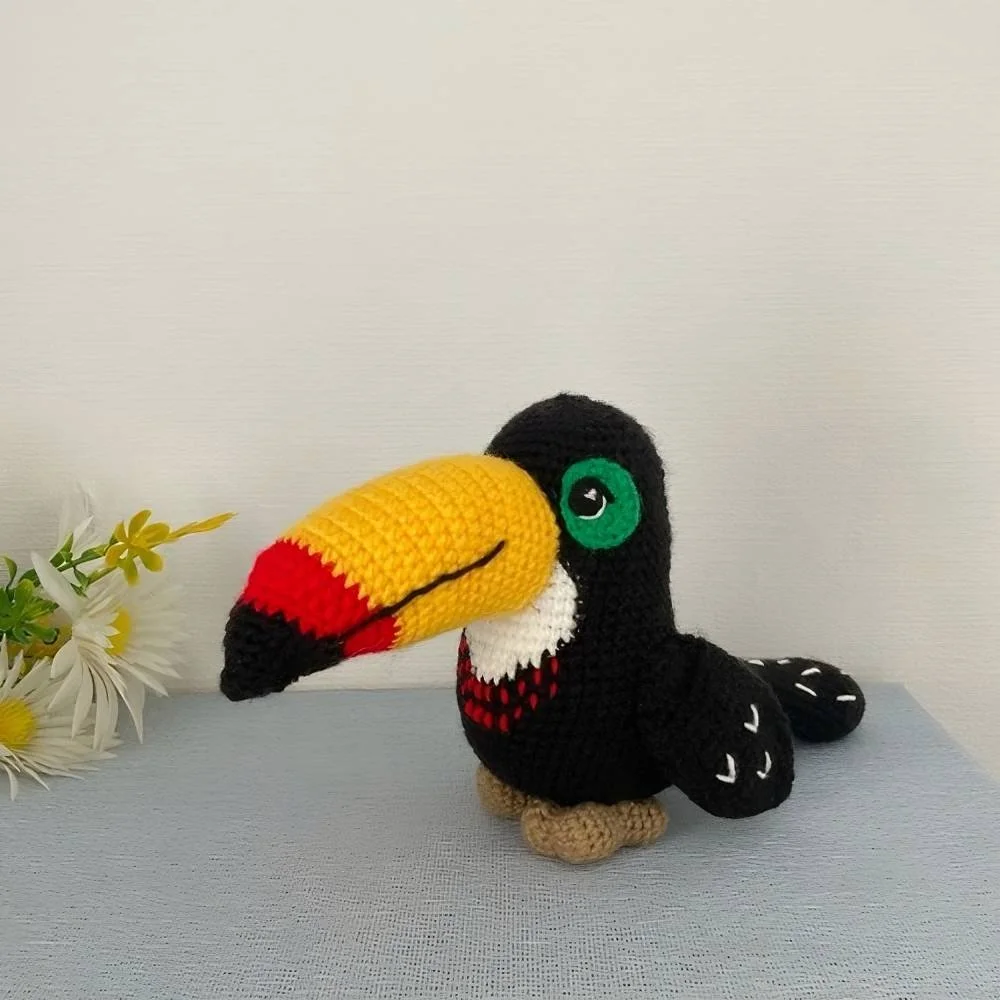
Say hello to Zazu, the toucan who seems to have flown straight from the heart of the jungle into your yarn basket. This Free Realistic Tropical Toucan Crochet Pattern invites you to capture the spirit of one of the world’s most enchanting birds and bring it to life stitch by stitch. With every round of your hook, you’ll feel as if you’re weaving together not only yarn, but also the vibrant colors, playful energy, and mysterious beauty of the rainforest.
Zazu is not just a crochet project, he’s a character with personality. Imagine him perched on a branch, his oversized beak gleaming in shades of yellow, red, and black, his emerald eyes bright with curiosity. He has the mischievous charm of a jungle bird plushie, always ready to squawk out a cheerful tune. Whether you see him as a toucan amigurumi friend for a nursery, a bold handmade gift, or part of a growing collection of jungle animal plushies, he carries with him the magic of the tropics.
The finished Zazu measures about 12 cm tall, with a length of around 26 cm from the tip of his tail to the tip of his impressive beak. That size makes him the perfect crochet tropical bird toy: compact enough to sit neatly on a desk or shelf, yet detailed enough to showcase the artistry of your stitches. The pattern is written at an intermediate level, so it’s approachable for those who already know the basics of how to make amigurumi but want a rewarding project with some creative shaping and colorwork. You’ll use single crochet in the round, invisible decreases, and simple increases, along with half double crochet and double crochet for shaping the beak and wings. The order of the parts keeps the process smooth: body and head, tail, wings, feet, and finally that iconic beak. Once assembled, the embroidery details bring Zazu’s personality to life, little lines on his beak, white highlights on his eyes, and colorful accents on his wings.
One of the joys of this step-by-step English tutorial with photos is the creative freedom it offers. While the pattern uses bright contrasting shades, classic black for the body, crisp white for the chest, bold yellow and red for the beak, you can experiment endlessly. Maybe your toucan will wear a rainbow-colored beak, or a pastel palette for nursery décor. Perhaps you’ll make him in deeper jewel tones, turning him into a mysterious night bird. You can even play with yarn textures: cotton for a neat, defined look, or soft acrylic for a cuddly toy. Adding weighted pellets in the body gives him stability to stand proudly, while tiny accessories like a crocheted leaf perch or a mini flower crown can make him even more unique.
Toucans have long been symbols of communication, cheerfulness, and tropical abundance. In folklore, they are often seen as bringers of good luck and guardians of the rainforest. With Zazu, you’re not just making a cute toucan toy, you’re creating a little guardian of color and joy, a handmade reminder of the beauty of wild places. He’s a colorful jungle bird plushie that feels alive, a bridge between craft and imagination.
When finished, Zazu makes a whimsical handmade gift for a bird lover or a cheerful accent for your home. He can be gifted as a unique symbol of creativity or kept as your own cheerful crochet companion. Every detail you add is a reflection of your care, turning yarn into feathers, stitches into wings, and effort into joy. Crocheting Zazu is more than following written instructions, it’s about taking part in a creative journey. Each stitch brings you closer to holding a piece of the jungle in your hands, a reminder that handmade treasures carry not just color and form, but also the heart of the maker. So gather your yarns, let the rhythm of your hook carry you away, and bring this playful toucan to life.
Materials
Tap to check off what you already have
Abbreviations
- MR: Magic Ring
- sc: single crochet
- (…)*N: repeat the action in brackets the specified number of times
- sl st: slip stitch
- ch: chain
- inc: increase
- dec: decrease
- hdc: half double crochet
- dc: double crochet
Additional Information
- This pattern takes approximately 5 hours to complete.
- Crochet the parts in the order I suggest.
- Use invisible decreases.
- Crochet tightly so the fabric doesn't turn out “holey.”
- Pay attention to the marker line. In the pattern, I indicate when the marker should be realigned.
- Sew the parts on slowly, neatly, and symmetrically.
- Length from the tip of the tail to the tip of the beak ~26 cm, height ~12 cm.
- Your toy size may vary depending on your crochet tension, the yarn you choose, hook size, etc.
Top 10 Expert Tips for Crocheting Perfect Amigurumi 🧶✨
1. Choose your materials wisely 🎀: The right yarn and hook make all the difference. I always reach for non-fraying cotton or smooth acrylic, paired with a slightly smaller hook to keep the stitches snug. If you’re unsure where to start, check out our complete yarn and hook guide.
2. Consistent tension is everything 🤏: Good amigurumi starts with even stitches. If your fabric feels off—too loose, too stiff—don’t power through. Take a moment to swatch and adjust. Learn how to fine-tune in how to master crochet tension.
3. Mark every round—no exceptions 📌: Even after years of crocheting, I still use stitch markers religiously. It’s not about memory—it's about precision. For more tricks I swear by, read our stitch marker tutorial.
4. Stuff slowly and intentionally 🧸: Overstuffed toys lose shape, underfilled ones collapse. I add fiberfill gradually, shaping as I go. There’s an art to it, and you’ll get it with practice—or by reading how to stuff amigurumi without wrinkles.
5. Sew with care and patience ✂️: Don’t rush the assembly. Seam invisibly, match edges, and always secure your threads deep inside. A clean finish is what sets great work apart. Follow the steps in professional amigurumi sewing techniques.
6. Texture brings life to your stitches 🔄: A little puff stitch here, a popcorn detail there—they add so much personality. When used thoughtfully, texture makes even the simplest design shine. See examples in creative crochet textures.
7. Use safe, secure details—especially for little hands 👀: I’ve made hundreds of toys for children, and I never compromise on safety. Reinforced safety eyes or embroidered features are always my go-to. Read my checklist in amigurumi safety and finishing touches.
8. Let color tell the story 🌈: Whether it’s muted earth tones or bright pastels, color changes everything. Don’t be afraid to experiment—just make it your own. If you need ideas, browse unique amigurumi customization ideas.
9. Document your process 📓: After so many years, I can’t count how many times notes saved me from repeating a mistake—or helped me replicate a success. Stay organized with our project tracking template.
10. Trust the process, not perfection ⏳: Some projects take longer. Some need to be unraveled. That’s okay. The magic is in the making. When you hit a block, revisit tips to keep your crochet momentum.


Let's Get Started
Check off each row as you progress to track your steps.
Tail
Start crocheting with black yarn.
Add stuffing with weight (optional) approximately up to Rnd 10. Then continue with regular stuffing (not tightly) up to Rnd 27.
Change yarn to white. Fasten off the black yarn and cut.
Flatten the opening and crochet 6 sc through both sides.
Fasten off and cut the yarn.


Body – Head
Start crocheting with black yarn.


Insert weighting material and stuffing into the bottom of the body. Continue stuffing firmly and evenly as you crochet.
Make additional offset stitches (I needed 2) to reach the center of the back. We'll now crochet the white chest.


Prepare the white yarn. The notation used from here on: (BL) – black yarn, (WH) – white yarn.
Cut the white yarn. Continue crocheting with black yarn only.
Don’t forget to add more stuffing.
Close the opening, fasten off the yarn, and hide the end.


Wings (make 2)
Crochet with black yarn. Do not stuff.
Close the opening. Fasten off, cut the yarn, and hide the end.

Beak
Start with black yarn.
The marker line will run along the side of the beak.
Change yarn to red. Fasten off the black yarn and cut.
Change yarn to yellow. Fasten off the red yarn and cut.
Fasten off and cut the yarn, leaving a long tail for sewing. Stuff the beak.


Feet (make 2)
Add a small amount of stuffing. The piece should be soft and squeezable.
Close the opening, fasten off, cut the yarn.
Next, we’ll make the shaping of the feet – see the photos below.


Use the same yarn as for crocheting the feet.
Make shaping on each side of the foot, stepping 5 rounds away from the edge.
You should get 2 toes in the front and 2 in the back.


Eyes
With green yarn, make 2 pieces:
Make a sl st, fasten off, cut the yarn, leaving a tail for sewing.
The hdc and dc part is the bottom side.
With black yarn, make 2 pieces:
6 sc in MR, sl st in the first stitch.
Fasten off and cut the yarn, leaving a short tail for sewing.
Sew the black circles onto the green pieces near the last stitch of Round 3 (see photo).


Assembly and Finishing
- Sew the feet to the bottom of the body.


- Attach the beak with pins between Rounds 23 and 35. Make sure it is placed exactly in the center relative to the feet, and that the tip points downward. Toucans have a flat beak. While sewing, slightly pull it vertically. Don’t forget to add stuffing.


- Sew the wings to Round 19 of the body on each side. The first rounds of the wings should be directed slightly to the side and downward (see photo).

- Place and pin the eyes between Rounds 28 and 35 on both sides of the beak. Position them 1–2 stitches away from the beak, with the pupil closer to the bridge.
- Use thin white yarn to embroider the highlights and sclera. Use black yarn to embroider the lash line.


Continuation
- With black yarn, embroider a smile line on both sides of the beak.
On the left side, run the yarn from Round 8 (where the color change line passes) to the space between stitches 4 and 5 of Round 22.

On the right side, run the yarn from stitch 16 of Round 8 to the space between stitches 10 and 11 of Round 22.

- Use white yarn to embroider the patterns on the wings and the lines on the tail. Use red yarn for the chest.


- Secure, cut off, and neatly hide all yarn ends inside the toy.


Thank you!
Congratulations on finishing your crochet project. Every stitch tells a story — and this one is uniquely yours. 💖
Share your workHate Ads? Get the PDF Version!
Enjoy a distraction-free experience, unlimited access, print, and get full support!

Get the PDF Version!
- ⚡ Instant access right after purchase
- 📄 High-quality and Printable PDF
- 👩💻 24/7 support for your questions
- 📱 Works offline on any device
- 🚫 Ad-free experience


Search by categories
Swipe sideways to see more categories


Contact Us
If you'd like your pattern to be shared and promoted, send us a message with the file attached—we’ll be happy to feature it, crediting you as the creator and including all your contact channels in the post so readers know it’s your work. If you’re also interested in collaborating, feel free to share your proposal here. We’d be delighted to work with you. Thank you so much for your understanding and collaboration!